
Are you failed to create database? Are you failed to connect the login/signup page to the wamp/xamp server?
You are watching many video tutorials or read many articles but did not understand how it works or how to works!!!
Don't worry about it. It's very simple. So let's get started!!!
The process is very simple!!! It's like the following 3 steps:
signup/login form(html/php) >>> Processing(php) >>> Database(mysql)
Firstly, you need to create a html/php file for signup/login.
Secondly, you need to create a database file by using wamp/xampp server.
Thirdly, you must create a php file for processing all the data between the html file and the database.
Funny!!!, isn't it?
Step1: Creating a html file
We are going to create a signup page now. To do that simply type the following codes in notepad or other text editor or IDE:
<html>
<head>
</head>
<body>
<form action="signup.php" method="post">
First Name: <input type="text" name="first"><br>
Last Name: <input type="text" name="last"><br>
Email:<input type="text" name="email"><br>
Password:<input type="text" name="password"><br>
<input type="Submit">
</form>
</body>
</html>
Now save this file as index.html
Our step1 is fineshed but remember that this is a simple code and its output may not like by you because it's output allignment is not perfect.You must create a nice looking form. As this post is about database connection, so i do not continue about this. I will post later about this.
Step 2: Creating a database file(using wampserver):
>Simply open your browser
>Type "http://localhost/phpmyadmin/" in your browser's address bar.
> phphmyadmin page will open and create a new database with your name or anything.

>Now Create a new table named anything you like & press the 'go' button
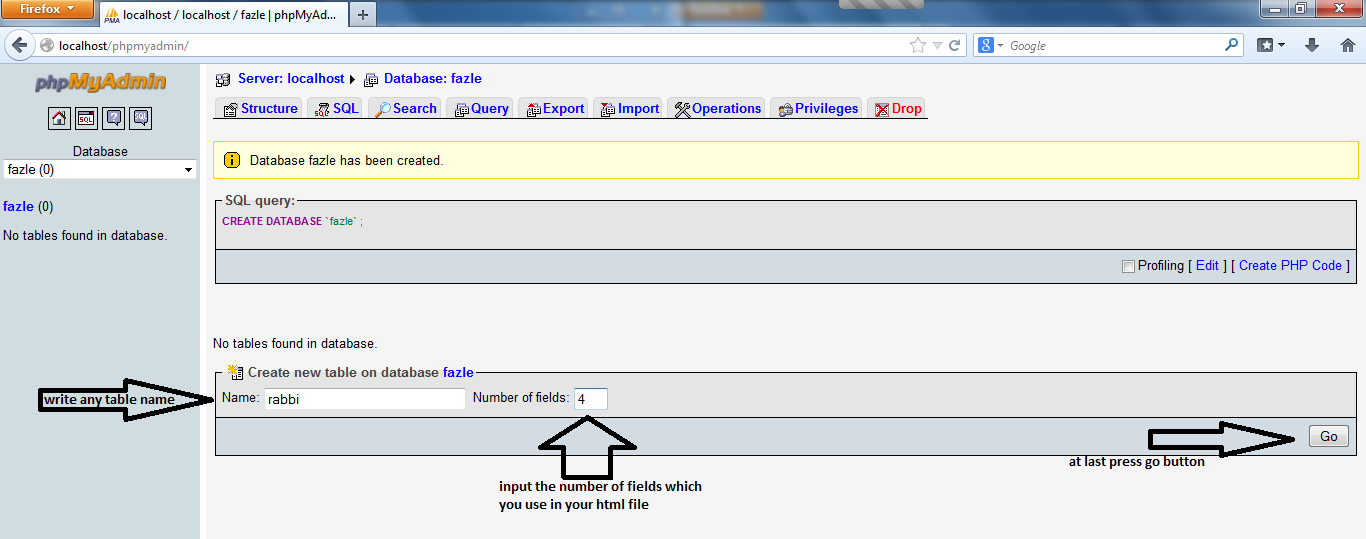
>Fill the fields which you were use in the html file i.e. first, last, email, password. Also give the 'length' and select 'type'.

>Let the other fields unchanged (You can also modify them if you want).
Relax!!! we are almost done with our database. Now we are going to create our php file which will process our step1's html file & step2's database file.
Step 3: Creating a php file
This is the most important section of our database connection.
Simply type the following codes.
<?php
$database="fazle"; //name of your database
$first=$_POST['first']; //this values comes from the html file after submitting by the user.
$last=$_POST['last'];
$email=$_POST['email'];
$password=$_POST['password'];
//connection to the database
$con = mysql_connect("localhost","root" ,""); //for wamp 3rd feild is balnk
if (!$con)
{
die('Could not connect: ' . mysql_error());
}
//select a database to work with
mysql_select_db("$database", $con);
//insert the data into table "rabbi"
$query = "INSERT INTO rabbi(first,last,email,password)VALUES('$first','$last','$email','$password')";
mysql_query($query);
//for showing script after submission of form
echo "<script type='text/javascript'>\n";
echo "alert('Welcome! You are Successfully Registered');\n";
echo "</script>";
mysql_close();
?>
Save this file as signup.php
Wait!!! We are almost done. Now put this both file in a single Folder and also put this folder in Wamp installation directory i means inside WWW folder. Actually the default path is C:\wamp\www
Now again type "http://localhost/" in your browser's address bar. Main Page of wampserver will be open. You will find your folder directory on bottom titled "Your Projects" in which we store our both files.
Now click on that folder. Our index.html page will open.
Now simply enter the details and Submit it. Message box will come "Welcome! You are Successfully Registered" that means you are successfully inserted data into your database.
Now simply enter the details and Submit it. Message box will come "Welcome! You are Successfully Registered" that means you are successfully inserted data into your database.
By the by, you should check that your data is really inserted or not. To do that, you need to go
>http://localhost/phpmyadmin/
>Select your 'database name'.
>After that select your 'table name'.
>At the top of your browser you will see the "Browse" tab.
>Select it.
Now you will the show the record at the bottom side and be sure that you are success!!!

*** If you like this post please share it so that others can be aware of this.. ***
Thanks.
Fazle Rabbi
PSTU(Patuakhali Science and Technology University)
No comments:
Post a Comment